Building a Camper Box for a Renault Kangoo
These days all climbers seem to have a van. On a sunny weekend trying to bag a space in the Llanberis Pass after 8.30am is near impossible thanks to the myriad of T5 conversions and stealth campers parked up over night. I figured it was time to get involved and come up with my own pocket friendly version.
The Base Vehicle
I would highly recommend this class of small van for a "weekend warrior van lifer". Its so practical for parking, stealth camping, and zipping around those all too narrow British country lanes. Of course winter trips aren't much fun - there's no heating and no real sitting space for whiling away those dark evenings. However for 3-season camping for up to two weeks it really is not bad. After all, the plan is to spend the days out and about climbing not siting in the vehicle. Vans to consider - Kangoo, Berlingo, Transit Connect, Doblo, Caddy. With the camper box removed these vans are great for multi purpose use (in my case shoving mountain bikes in the back).
Seats or no seats?
My Kangoo is the MVP version. That's to say it has rear seats and rear windows. In hindsight I would definitely choose the cargo van model. The rear seats rearly get used and as for the windows, these just create the problem of having to make curtains. The Camper Box I designed does work both with and without the rear seats in. However for the summer period I tend to have the seats removed permanently. So unless you have a family and have the requirement to carry passengers I would strongly suggest a cargo van vehicle. There are a couple of advantages of rear windows however. Being able to open them for ventilation - this I will admit is a handy feature. Additionally the overhead storage boxes that come with the MPV are aslo very handy
The Design
Step one: Look online for commercial kits and home builds to get inspiration
Step Two: Measure up the vehicle
Step Three: Decide on what is important. What features you require or do not need. Also how much you are willing to spend. How much time. My list looked like this....
- Should cost not much more than £350!
- Must be buildable in a couple of days or so.
- Needs to be easy to fold into the boot when not in use (when the seats are in anyway)
- Needs to work with and without rear seats
- Needs to have a comfortable bed for two
- Needs to have easily accessible storage
- Needs curtains
- Needs to be installed /removed easily (not fixing to the vehicle)
 |
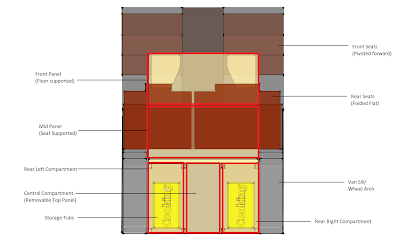
| Design Overview |
With the design firmly in mind either draw up or better still use some CAD software to model up both the van space and the new design.
 |
| Not much of a workshop |
The Bed
My foam bed was made up of 70mm high density foam, available online in abundance. I simply cut to size with a bread knife. Now the unit was starting to take shape and in only day and a half I had nearly finished.
 |
| The Red Arrow starting to take shape |
Upholstering was another matter. I procured some fabric from a local haberdasher (blackout material and some weird purple woolly stuff which was way too stretchy) and had a go at upholstering. With no access to a sewing machine this was slap-dash to say the least. But with the trade off between time spent and finished result I can't complain. They are upholstered and they are comfortable. Job done.
 |
| Getting there.. Just bin bags used here for temporary curtains |
Initially the curtains were off cuts of from the blackout material which I added suction cups to. They did work but it was fiddly and time consuming to put up. So In time I changed the design. I bought some strong magnets on amazon and using M3 screws and penny washers I fixed them to the blackout material I had. These now were fast to put up as the van interior is bare steel - so its simply a case of sticking the magnets to the metalwork. They can stay in position too and I can roll the curtains up and out of the way when not in use. So quick and easy. And no mechanical fixing to the van metalwork. (Pictures to be added)
Finishing Touches
Finding that the cushions would move about at night I decided to sew velcro strips on to hold them together (using my finest needlework) . It works well. Also I bought some additional storage tubs and fashioned a support for when the seats were removed. The tubs can be fixed to anchors in the van floor and thanks to some timber batons I added, are the perfect height for supporting the fold out panel that acts as the bed front. This is the default set up now throughout the summer months. It gives buckets of room for climbing gear, food, cooking gear, camping chairs etc.


